With the CD Player view, you can audition Compact Discs (CDs), conveniently acquire a CD's name and track titles via an Internet-based freedb CD data server, and quickly import this information into your VisiTrax library by clicking the Add button; this changes to an Update button once the data is in your library. (Track times are read directly from the CD.)
The CD Player view provides two slightly different views for CD track information, depending on whether the CD is by a single artist or group (first example below), or by various artists (second example), as set by the List Artists checkbox control:
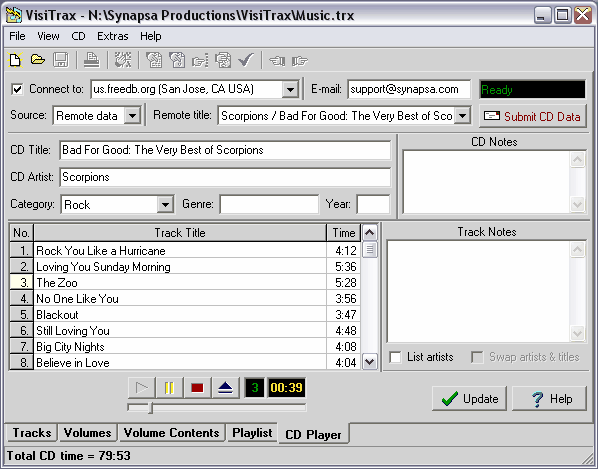
Example Single Artist CD View
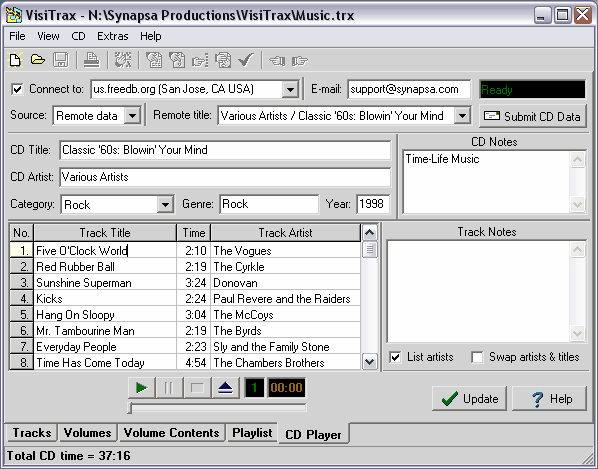
Example Various Artists CD View
If you have more than one CD-ROM drive, a drive selection drop-down list control (not shown above) will appear to the left of the player buttons. VisiTrax will remember the drive you select between sessions.
To have VisiTrax automatically detect CDs and activate the CD Player view whenever you insert a CD, select Auto-detect CDs from the View > Options menu. Auto-detection will commence the first time you enter the CD Player view in a given session.
Note: Some "Media Player" or "CD Player" programs might use a CD-ROM drive in an exclusive, non-shared mode. If one of these is running in this mode, no other CD player program will be able to access the drive. If the offending program has a configuration setting option for using the CD-ROM drive in shared mode, try that setting. Otherwise, you will need to stop the other player before the VisiTrax CD player can start up or begin to detect CDs.
Each time a CD is inserted, VisiTrax will try to find the CD's information in the following lookup sequence:
| • | First, VisiTrax will look for an entry in your VisiTrax library database. |
| • | Next, VisiTrax will look for an entry in your PC's CDPLAYER.INI file – a data file that is commonly used by various CD player programs. (If it exists, this file will be in your Windows root directory.) |
| • | Finally, if you have enabled an on-line connection to a freedb remote data server, VisiTrax will look for one or more matching entries from the server. |
Once the lookup has completed, the Source box will indicate one of the following data sources:
Visitrax library
cdplayer.ini
Remote data
The CD information displayed will be from the indicated data source. To view information from one of the other data sources, simply choose the source you want from the Source drop-down menu.
Usually, the initial source shown will probably be what you want. For example, if a given CD's data can be found in both the VisiTrax library and CDPLAYER.INI, the Source box will indicate VisiTrax library, as that would probably be the source you'd want to use. But if data were only available in your CDPLAYER.INI file, the Source box in that case would indicate cdplayer.ini.
When the data source is Remote data, another selection box – Remote title – comes into play. This box will always contain at least one menu option: None (new CD entry). If one or more matching entries are found from the remote data server, the drop-down menu for this box will also list a title for each entry found. If you choose one of these titles, VisiTrax will download the corresponding remote record and display its contents in the various CD information data fields.
Note: The CD player's Category box is intended primarily for use with remote data server functions, and will be disabled unless a remote data server has been accessed. It should be noted also that, although the Category box's drop-down menu will be limited to the set of category names downloaded from the remote data server, this constraint exists only within the CD Player view, and you are always free to use any category names you wish in your VisiTrax library database proper.
Playing CD Tracks
To begin playing a CD track, do any of the following:
| • | Click on the |
| • | Click on one of the track number cells in the |
| • | Select a track title and press Enter. |
| • | Select Play from the CD menu. |
Editing CD Information
To edit CD information, click or tab into each field and edit as necessary. You can edit information for any track, regardless of any track being played. Changes can be saved in any of the following ways:
| • | To save changes to your computer's shared CDPLAYER.INI file, select Write to CDPLAYER.INI from the CD menu. |
| • | To save changes to your VisiTrax library database, click on the Add / Update button (this also updates CDPLAYER.INI). |
| • | To save changes to freedb, click on the Submit CD Data button (also see Submitting CD Data, below). |
Track Titles and Subtitles
When a CD's track titles are filled in from your VisiTrax library database, and a given database track record contains a subtitle, a composite title will be displayed, consisting of both the title and subtitle separated by a colon; for example (colors for illustration only):
Symphony No. 6 ("Pastoral"), Op. 68: I. Allegro ma non troppo
Conversely, when you Add or Update a CD's data to your VisiTrax database from this view, subtitles will be split out from the title – provided the following conditions are all true:
| • | the title contains two parts separated by a colon followed by a space; |
| • | an adjacent title also contains two parts; and |
| • | the first part is identical in both adjacent titles. |
The reason for the above constraint is to reduce the chances of a "false hit", where a colon may appear as part of a title for reasons other than to denote a subtitle.
Using freedb
To begin using freedb, be sure you have an established Internet connection, then click on the Connect to checkbox. As long as this checkbox is activated, on-line data lookups are initiated automatically for each CD inserted. (If you have an always-on Internet connection, you may wish to select Auto-connect to Server from the View > Options menu.)
Note: VisiTrax uses your web browser's settings to determine whether you use dial-up networking and/or a proxy server. If you use dial-up networking, you'll need to establish a dial-up connection before performing this operation.
The freedb servers receive submittals from thousands of users all over the world, so you can expect to find errors on occasion. Once a CD's information has been acquired, look over the information for typographical errors or other inconsistencies. VisiTrax lets you correct or modify this information at several stages:
| • | The first stage is in the CD Player view itself. This is most useful when you see errors in freedb's data: simply correct the data in this view, submit the corrections back to the CD data server for posterity, then click on the Add button to import the data into your VisiTrax library. |
| • | The second stage is in the Add New CD dialog that appears after clicking on Add in the CD Player view. While the freedb community tends to list artists using the form "John Smith", or "The Beach Boys", you might prefer the catalog index format, such as "Smith, John" or "Beatles, The" (or just "Beatles"). You could do this in the CD Player dialog, of course, but you wouldn't necessarily submit such changes back to freedb. Using the Add New CD dialog for this purpose also lets you take advantage of the dialog's "smart data entry" features. (Don't forget to assign a CD index here while you're at it.) |
| • | Once you click the Add button in the Add New CD dialog, the CD's individual track records will also be added, automatically. Editing these individual track entries would comprise the third, track-level stage. One of the things you might want to do here is adjust the Category for each track, and perhaps enter or change other information, such as the release year. |
Note: Once a CD has been added to your library, the Add button will be replaced with an Update button.
| Hint: | To quickly shift names around in an artist field, or shift words around in a title field, simply double click on that field. For example, this could be used to change "John Smith" to "Smith, John", or vice versa. |
Track Artists and freedb
Due to some laxity in the original CDDB protocol specification, freedb's database is somewhat inconsistent with respect to track artist information for compilation CDs with multiple artists. Commonly-seen variations within the data include:
| • | track titles of the form "artist / title" or "title / artist" |
| • | track titles of the form "title - artist" or "artist - title" |
| • | track titles of the form "title (artist)" or "artist (title)" |
| • | track titles of the form "title; artist" or "artist; title" |
| • | artist entered in the "extra track information" field |
| • | no track artists specified at all |
The most recent protocol, as published by freedb.org, now states a preference for the "artist / title" convention, with a space on either side of the "/". Thus, VisiTrax looks for track artists using the following order of precedence:
1. All track titles contain a "/" splitter [artist / title is assumed]
2. All tracks contain a single line of Extra data [thus probably track artists]
3. All track titles contain a "-" splitter [typically title - artist]
4. All track titles contain parentheses [typically title (artist)]
5. All track titles contain a ";" splitter [typically title; artist]
If VisiTrax detects what appear to be track artists, it will automatically attempt to separate the artist and title information, displaying the Track Artist column. You can manually show or hide this column via the List Artists checkbox control.
If it appears likely that the artist and title obtained from the CD data server might have been transposed, VisiTrax will display a warning message. The Swap Artists & Titles checkbox can be used to swap the contents of the Track Title and Track Artist columns.
What if my CD isn't found on freedb?
If you're working with a custom CD of your own, or with a published CD that just doesn't happen to be listed (yet) at freedb, your main objective will be to add its data to your VisiTrax library database, or to CDPLAYER.INI, or to both. If the data is not available in either place (you can check this using the Source box drop-down menu options), simply fill in the data for the CD as needed. Once all of the essential information has been filled in ("Notes" fields can be left empty if desired), click the Add button to add the CD to your VisiTrax database, as described above. You can also click the Add button without filling in any data, in which case VisiTrax will ask if you want to use the Add New CD dialog; this option gives you access to some smart data-entry features not available in the CD Player view, so you may prefer this alternate data entry approach.
In some situations (depending in part on other programs you might also be using), you might find your CD's data (or much of it) is already available from CDPLAYER.INI. If that's the case, you'll only need to add or modify data as needed, rather than having to enter everything from scratch.
If you're working with a published CD that was not listed on the freedb server, see also Submitting CD Data, below.
Updating an Existing CD Volume Entry
Once a CD has been added to your library, the Add button will be replaced with an Update button. Clicking Update will update the existing CD volume entry, and its corresponding track entries, using the data that appears in the CD Player view. This can be handy, for example, if you happen to catch a spelling error in one of the titles while in this view. (Note that Update will not disturb existing information not ordinarily seen in this view, such as volume locator index, or track category, year, lead-in time, etc.)
What if I already entered my CD as a "New Volume"?
Each compact disc has a (relatively) unique media identifier code and CDDB-style disc identifier code. VisiTrax uses these numeric codes to associate a physical compact disc with its corresponding volume database record. Normally, this association takes place automatically when you click on the Add button from the CD Player view. However, the Add New Volume and Volume Details dialogs also let you perfom (or change) this association.
Submitting CD Data
The freedb service is likely to find entries for most of your CDs. If your CD is not found (and it's a published CD, not some custom job) you can enter its data and submit it to the server via the Submit CD Data button. You can also submit corrections to existing entries. Before you begin making submittals, though, look at a reasonable number of examples of existing CD entries, so you can become somewhat familiar with common practice (or at least preferred practice):
| • | Titles, artist names, etc., should use standard capitalization rules for mixed-case titles. |
| • | If the CD contains tracks from various artists, the CD's Artist field should be "Various Artists", or something equivalent. |
| • | Titles and artist names should be of reasonable length. |
| • | Careful spelling and punctuation is generally appreciated. |
| • | "Special" characters beyond those used for ordinary narrative text, should be avoided. |
| • | Avoid using the slash character ("/") in the title and artist edit fields. |
CD data submittals require an e-mail reply address, so that you can be notified if there's a problem. Enter your e-mail reply address in the E-Mail field.
The Submit CD Data button action will be inhibited unless a certain set of minimal conditions have been met. This reduces the likelihood of accidentally sending an incomplete or useless submittal. Conditions include an e-mail address, no empty fields that shouldn't be empty, and (in the case of changes) some difference versus the original data record.
Naturally, it makes no sense to submit a new CD without first confirming that it is, in fact, a new CD as far as freedb is concerned, and VisiTrax performs several checks to ensure this has happened. The selected option in the Remote title box will establish whether the submittal will be a revision against an existing CD title, or a submittal for a new CD entry. The Submit CD Data button's pop-up hint will indicate the revision level of the submission; new CD entries are always submitted as revision 0, while revised submittals will always be submitted with a revision number one greater than that of the original data record most recently downloaded.
Resolving CD Player or CD Server Performance Issues
VisiTrax accesses freedb's CD data servers just like a web browser. Occasionally, you might encounter an error message or other performance problem while accessing a server. Unless the error message indicates something specific in this regard, usually the best course of action is to try the access at least one or two more times before concluding that there's a problem of any significance.
If errors tend to occur frequently, or if server accesses appear to be too slow, try choosing a different site via the Connect to drop-down list. (Sometimes the fastest-responding server is not the geographically closest one.)
To re-acquire the list of CD data server sites, click inside the Connect to editing box and press the Enter key. The list of servers will be (re-)acquired from the site shown. To specify a different CD data server, choose it from the drop-down list, or type in its address (if this field is blank, the original standard address will be restored).
To re-establish communications with a specific server, choose it from the Connect to drop-down list. This also forces a fresh CD title query if you have a CD inserted.
To repeat a CD title query from the current server, either re-choose the server from the Connect to drop-down list, or choose Refresh from the CD menu.
To re-read a specific CD's track information for a given CD title, re-choose the CD title from the Remote title drop-down list.
To force a re-read of data from the CD, choose Refresh (read CD again) from the CD menu, or press Ctrl-F5.
If you continue to encounter problems with freedb using VisiTrax, please send us an e-mail message with as much relevant detail as possible.
| See also: | Installation and Configuration |