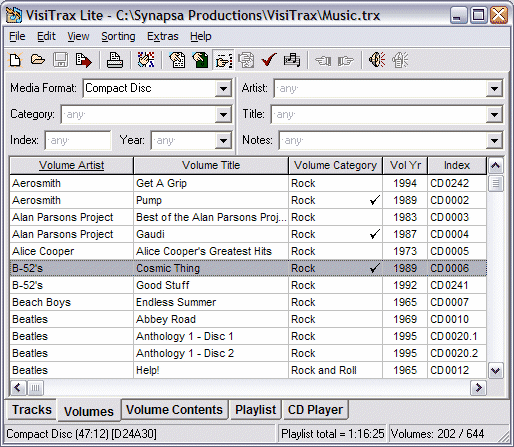
The Volumes View lists the volumes contained in the library (subject to any viewing filters you might have set), as shown below. This is the view you would use for adding, deleting, or updating volume entries.
On startup, volumes in this view will appear sorted from left to right (i.e. the leftmost column is the primary sort key). To change the sort ordering, click on the corresponding column header, or make a selection via the Sorting menu. As with the Tracks View, sorting is based on the most recent set of columns selected for sorting, with precedence given to the most recently selected columns.
To quickly reset sorting precedence based on current column ordering, click the ![]() button (sort across).
button (sort across).
Volume Filtering (and Locating Volumes)
The set of volumes listed here depends in part on the filtering controls you have set in the Tracks View. Volume filtering logic is based on a combination of volume attributes and track attributes:
| • | Volume attributes apply to the volume as a whole: media format, volume artist and title, notes, etc. – in other words, things you can enter via the Add New Volumedialog. |
| • | Track attributes apply to individual tracks, not the volume as a whole. However, it's often useful to list only those volumes containing tracks with some particular set of attributes; for example, volumes containing anything by Jethro Tull (even if just one song). |
Filters in the Volumes view generally behave and can be used just like the filters in the Tracks view. The available volume-specific filtering controls are summarized as follows:
| Media Format | Use this to view only those volumes of a particular media format. |
| Index | Use this to view only those volumes with a specific index number, or range of index numbers. |
| Category | Use this to view a particular volume category or subset of categories. |
| Artist | Use this to view a particular volume artist or subset of artist names. |
| Title | Use this to view a particular volume title or subset of titles. |
| Notes | Use this to view volumes based on the content of their notes. |
| Year | Use this to view a particular volume year or range of years. |
The ![]() toolbar button, if enabled, indicates that the listed set of volumes is being constrained by one or more track-specific filtering attributes. Clicking this button will remove all track-specific filtering in one step, without having to switch views. (The button is not enabled unless one or more volumes is being filtered out solely due to track filtering.)
toolbar button, if enabled, indicates that the listed set of volumes is being constrained by one or more track-specific filtering attributes. Clicking this button will remove all track-specific filtering in one step, without having to switch views. (The button is not enabled unless one or more volumes is being filtered out solely due to track filtering.)
| Note: | In addition to the filter controls described above, you can use column sorting to quickly identify volumes based on other volume attributes, such as Vol Time. |
Navigating the List
You can scroll through the list of volumes as you would with any standard Windows listbox. If you click on a particular volume (or use the up- or down-arrow keys to do the same thing), it becomes highlighted, as shown above, and the media format for that volume is displayed on the status bar at the bottom left.
The right-hand section of the status bar indicates the number of volumes in the list, and the total number of volumes in the library. In the example shown, no filters have been applied, so the list contains all 512 of the library's volumes.
If you double-click on a selected volume, VisiTrax will switch to the corresponding Volume Contents View so you can view its tracks.
Also in the example, note that the highlighted volume happens to contain a checkmark, indicating that one or more tracks have been entered into a playlist, in the current session. Since there is an active playlist, the Playlist view tab is shown, and the middle status bar section indicates the total playlist time.
To access details for a selected volume (i.e. the volume as a whole, not its tracks), press the space bar, or choose Update Details from the Edit or right-click menu.
Additional Data Columns
The Volumes view includes many additional data columns that you don't normally see. To access these additional columns, simply scroll to the right using the horizontal scroll bar at the bottom of the listing. These additional columns are always available, and you are free to move any columns in or out of the main set. For more information on how to do this, see Changing Which Columns You See.
Note that some columns contain data for which there are no manual data entry fields, either because the data is automatically computed (e.g. Disc ID and Vol Time), or because it's simply an alternate representation (e.g. Location).
Shortcuts:
| • | While in the listing, typing the first part of the volume's artist name or title will scroll the list to the first matching entry (depending on current column sort precedence). A one-second pause in typing starts a new sequence. |
| • | Function key F2 (also Enter) returns focus to the list. |
| • | Function key F3 will clear all filters. |
| • | Function key F4 will activate a filter field's menu (as applicable). |
| • | Function keys F5 - F11 provide shortcuts to each of the filter fields. |
Playing MP3 and other Audio Files
If the currently highlighted volume contains one or more tracks linked to MP3 or other audio files, clicking the ![]() toolbar button will do one of two things:
toolbar button will do one of two things:
| • | If Winamp v5 is installed on your PC, all of the audio file tracks in the highlighted volume will be added to Winamp's playlist, and played. |
| • | Otherwise, the first audio file track will be played by the associated media player program (if any). |
Volume Index Resequencing
On occasion you may wish to resequence some of your volume index numbers. To do this, apply appropriate filters to list only those volumes whose index numbers you wish to resequence, apply the desired sort order, then select Re-index Volumes from the Edit menu.
Example: To resequence Compact Discs in the range CD8000-8999, select Compact Disc (or equivalent) in the Media Format filter field, and enter 8000-999 in the Index filter field. Next, ensure the volumes are listed in the order you want, then select Edit > Re-index Volumes.
| See also: | View Options and Customization |